Contents
- 1 How to Properly Use an Ear Gauge Taper and Plug Stretching Kit
- 1.0.1 Know what you’re getting into
- 1.0.2 Gather the right equipment
- 1.0.3 Check that your current piercing is ready
- 1.0.4 Prepare your workspace and lobes
- 1.0.5 Aftercare for a fresh stretch
- 1.0.6 Establish a safe stretching schedule
- 1.0.7 Troubleshooting and common mistakes
- 1.0.8 When to seek professional help
- 1.0.9 Long‑term maintenance
- 1.1 Concluding thoughts
- 1.2 The Ultimate Guide to Ear Jewellery
- 1.3 The Ultimate Guide to Body Jewellery
- 1.4 Nose Studs: Timeless Beauty and Modern Expression
How to Properly Use an Ear Gauge Taper and Plug Stretching Kit
 Stretching your ears is a gradual and rewarding body modification process, but it must be done carefully to avoid pain, infection, or permanent damage. Whether you’re starting from a standard ear piercing or looking to size up safely, using an ear gauge taper and plug stretching kit correctly is essential. This guide will walk you through everything you need to know, from choosing the right materials and preparing your lobes to proper stretching techniques and aftercare, so you can achieve healthy, evenly stretched ears without complications.
-
Know what you’re getting into
Ear stretching (also called gauging in some regions) permanently enlarges the piercing hole in your lobe. Reversal is unpredictable once you pass about 8 g (3 mm), so move forward only if you’re comfortable with a lifelong change. Speak to a professional piercer first; they can assess your anatomy, explain realistic size limits, and flag any pre‑existing scar tissue or keloid tendencies that could complicate the process.
-
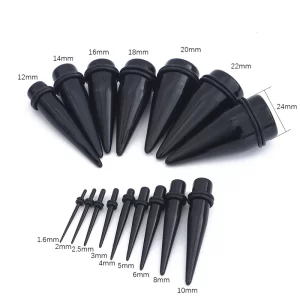
Gather the right equipment
A reputable taper‑and‑plug kit should include:
-
-
- Implant‑grade jewellery – Surgical steel (316LVM), ASTM F‑136 titanium, or glass. Avoid acrylic and silicone for fresh stretches; they’re porous and more likely to trap bacteria.
- Single‑flared or no‑flare plugs for each increment. These gently follow the taper into the lobe and leave room to swell.
- Matching straight tapers in consistent 1 mm (approx. 2 g) or smaller jumps. Spiral tapers and massive “one‑push” kits look cool, but apply uneven pressure and tear tissue.
- Lubricant – A dedicated water‑based piercing glide or plant oil such as jojoba or vitamin E.
- Disposable nitrile gloves, sterile saline spray, cotton gauze, antibacterial hand wash, and (if you live in a humid climate) fragrance‑free talc or piercing‑safe drying powder.
-
Quality kits cost more but protect your health; bargain packs often have rough seams, mystery metals, or inaccurate sizing.
-
Check that your current piercing is ready
-
-
- Age – An initial lobe piercing should be at least 6 months old and feel pain‑free, flexible, and evenly healed.
- Diameter – Most ready-made earrings measure 18 –20 mm (1 mm). Your first stretch should be to 16 g (1.2 mm) or 14 g (1.6 mm) at most—never jump straight to 10 g or larger.
- Health – No redness, crust, “wet” discharge, or tenderness. If any exist, delay stretching and treat the irritation first.
-
-
Prepare your workspace and lobes
-
-
- Scrub a sink or small table with household disinfectant. Lay a fresh paper towel as a sterile field.
- Wash hands (30 s, warm water, non‑scented soap), then don gloves.
- Soak your lobes in warm saline (¼ tsp non-iodised sea salt in 250 mL water) or hold a clean, hot washcloth against them for 2–3 minutes. Heat boosts blood flow and makes tissue more elastic.
- Rinse and pat dry with disposable gauze. Do not use cotton buds; stray fibres irritate.
-
-
-
- The taper insertion technique
-
Step‑by‑step
-
-
- Lubricate the taper and the lobe entrance lightly, enough to glide, not slide out of your grip.
- Line up the shallow end of the taper with the piercing channel. Breathe in.
- Exhale slowly while pushing the taper straight through until you reach the thick end. If you feel sharp pain, stop; pain means tearing. Mild pressure is fine—burning or stinging is not.
- With the taper still in place, butt the matching plug up against its base.
- Gently follow the taper out with the plug in one controlled motion, maintaining a straight path. (Never leave a metal or acrylic taper in your ear as jewellery; its weight and uneven length distort healing.)
- Secure the plug with an ‘O‑ring’ only if it’s single‑flared and the ring fits loosely. Over‑tight O‑rings trap moisture.
-
Tip: Stretch one ear at a time. If both lobes swell, you can still sleep on the unstretched side.
-
Aftercare for a fresh stretch
-
-
- Saline soaks – Twice daily for the first week.
- Hands off – Resist twisting or removing the plug for at least 6 weeks (the average cellular turnover for lobe tissue).
- Dry thoroughly – Moist creases breed bacteria; pat with gauze and optionally dust a piercing‑grade drying powder.
- Avoid irritants – Hair products, fragrances, sunscreen, pools, and submersion in natural bodies of water harbour microbes.
- Nutrition & hygiene – Stay hydrated, eat a balanced diet, change pillowcases, and wipe phone screens.
-
Healing times vary, but most lobes feel “normal” again in 6–8 weeks. Wait until that point plus two extra weeks before sizing up.
-
Establish a safe stretching schedule
A conservative timeline adds 1 mm every 6–8 weeks until 8 g (3 mm), then every 8–10 weeks as you move into larger diameters. Past 0 g (8 mm), slow even further—scar tissue accumulates quicker at big sizes, and blowouts become common.
|
Gauge |
Millimetres |
Minimum rest before next size (avg.) |
|
16 g |
1.2 mm |
6 weeks |
|
14 g |
1.6 mm |
6 weeks |
|
12 g |
2.0 mm |
6 weeks |
|
10 g |
2.4 mm |
8 weeks |
|
8 g |
3.2 mm |
8 weeks |
|
6 g |
4.0 mm |
8–10 weeks |
|
4 g |
5.0 mm |
10 weeks |
|
2 g |
6 mm |
12 weeks |
|
0 g |
8 mm |
12+ weeks |
Treat this table as a floor, not a deadline. Your body—not a calendar—decides readiness.
-
Troubleshooting and common mistakes
|
Mistake |
What happens |
Fix |
|
Skipping sizes |
Micro‑tears, blowouts (a fleshy ring pushed out at the back), permanent thinning |
Downsize immediately to the last comfortable plug; apply warm compresses and saline soaks daily until healed. |
|
Using tapers as jewellery |
Uneven weight distribution keeps stretching a single point |
Switch to a proper plug once the taper is through. |
|
Acrylic or silicone in fresh stretch |
Porous; traps sweat, bacteria, and biofilm |
Stick to steel, glass, or titanium for at least two size increases before introducing porous materials. |
|
Twisting jewellery dry |
Shears’ fragile new tissue |
Lubricate or soak before any plug removal. |
|
Using alcohol or peroxide |
Over‑dries, kills new cells |
Saline only (or mild, fragrance‑free soap during showers). |
-
When to seek professional help
-
-
- Severe swelling, throbbing heat, or pus unresponsive to saline after 24 hours could indicate infection.
- Blowouts larger than a grain of rice need a piercer’s assessment; you may require surgical removal if they scar.
- Persistent thin spots along the lobe edge signal overstretching and risk splitting. A piercer can install heavier plugs to redistribute weight or advise surgical repair.
-
Never use cortisone creams or oral antibiotics without medical instruction.
-
Long‑term maintenance
Once a stretch is fully healed (no tenderness when you tug lightly), adopt a “pop‑out, wash, and oil” routine every week or two:
-
-
- Remove the plug in the shower.
- Wash the lobe and jewellery with warm, fragrance‑free soap, rinse thoroughly.
- Massage a drop of jojoba or vitamin E oil into the lobe for 30 seconds—this boosts blood flow, reduces micro‑scars, and keeps tissue supple.
- Dry and re‑insert the plug.
-
At large sizes (≥12 mm), consider lightweight metals, stone, or wood for daily wear, reserving heavier steel for short periods to prevent thinning.
-
Concluding thoughts
 Proper ear stretching is closer to marathon training than a weekend DIY project. Respect the biology of wound healing: create minimal trauma, let the body repair, then build on a solid foundation. By investing in a high‑quality taper‑and‑plug kit, following incremental sizes, and sticking to meticulous hygiene, you’ll minimise blowouts, infections, and scar tissue, and enjoy beautifully stretched lobes that last a lifetime. If ever in doubt, hit pause and consult a professional piercer. Your ears will thank you for the patience.
[…] traditional lobe piercings, ear jewellery has evolved to include cartilage rings, helix piercings, tragus studs, and ear cuffs. The […]